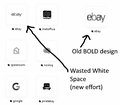
Icons have just become smaller with a WIDE white space after update - can it be reversed?
I posted this very same headline about seven months ago and a contributor called jscher2000 provided an awesome solution:-
In short it involved Double-clicking the browser.newtabpage.activity-stream.newNewtabExperience.enabled preference to switch the value from true to false
It instantly solved the problem of having tiny little icons surrounded by a HUGE border of wated white space - the result of an "upgrade".
Alas, I made the mistake of allowing FF to upgrade again and now the tiles are shrunk back to a level where people like me who are blind as a bat, cannot really see what the icons are any more.
I checked and the original solution is still set to "FALSE", but Firefox is now ignoring that.
I realise that someone has decided this looks "cooler" or "sleeker" so we should have no choice in the matter anymore, - it's just a shame that it is also far harder for people with grotty vision. The obsession with changing things from clear and simple to "smart but difficult" seems so silly.
Other than re-installing an older version and not making the mistake of letting it "upgrade" to a less useful version again, is there anything I can do to make it so I can still actually SEE the contents of the tiles - other than buy stronger glass and get used to even more wasted white-space?
Is there are new way to fix the broken "improvement" please ?
All Replies (1)
You can add CSS code to the userContent.css file.
/* about:home - about:newtab - userContent.css */
@-moz-document
  url-prefix(about:newtab),
  url-prefix(about:home) {
   .top-site-outer .tile .icon-wrapper {
     height: 100% !important;
     width: 100% !important;
   }
   .top-site-outer .default-icon,
   .top-site-outer .search-topsite {
     background-size: 100% !important;
     height: 100% !important;
     width: 100% !important;
  }
  .top-site-outer .search-topsite {
     height: 32px !important;
     width: 32px !important;
  }
}
It is not that difficult to create userContent.css if you have never used it.
The first step is to open the "Help -> Troubleshooting Information" page and find the button to access the profile folder.
You can find the button to go to the profile folder under the "Application Basics" section as "Profile Folder -> Open Folder". If you click this button then you open the profile folder in the Windows File Explorer. You need to create a folder with the name chrome in this folder (name is all lowercase). In the chrome folder you need to create a plain text file with the name userContent.css (name is case sensitive). In this userContent.css text file you paste the text posted. On Mac you can use the TextEdit utility to create the userContent.css file as a plain text file.
In Windows saving the file is usually the only time things get more complicated because Windows can silently add a .txt file extension and you end up with a file named userContent.css.txt. To avoid this you need to make sure to select "All files" in the dialog to save the file in the text editor using "Save File as".
You need to close (Quit/Exit) and restart Firefox when you create or modify the userContent.css file.
See also: More info about userContent.css and userChrome.css in case you are not familiar: *https://www.userchrome.org/what-is-userchrome-css.html
In Firefox 69 and later you need to set this pref to true on the about:config page to enable userChrome.css and userContent.css in the chrome folder.
- about:config => toolkit.legacyUserProfileCustomizations.stylesheets = true
- https://www.userchrome.org/firefox-changes-userchrome-css.html

