

Is there any way to make the new downloads panel show the current speed of a download?
With the new downloads panel, the current speed of the download is missing. Having to click on show all downloads and open another windows just to see the current speed is cumbersome. Is there any way to add the current speed of a download back to the download panel?
தீர்வு தேர்ந்தெடுக்கப்பட்டது
The only solution I found is complicated, and it must be repeated every time Firefox is updated. I will try to detail it as simply as I can.
1. Paste the following address into the address bar and press Enter.
- chrome://browser/content/downloads/download.xml#download
2. Copy the entire code to the clipboard. The code portion is the stuff displayed on a white background (though the color may differ on your setup). It starts after the notice at the top that says, "This XML file does not appear to have any style information associated with it. The document tree is shown below."; do not copy the notice itself.
3. Start a text editor, like Notepad, and paste the clipboard contents there.
4. Change id="downloadBindings" to id="downloadBindings-mod"
5. Change id="download" to id="download-mod"
6. Look for class="downloadDetails" (N.B.: in the current version, there are two such instances in the file). On that same line, change the text fragment xbl:inherits="value=status to xbl:inherits="value=statusTip
7. Open your Firefox profile folder. In that folder, create a new folder named chrome if a folder by that name doesn't already exist.
8. Save the file as downloadSpeed.xml in the chrome subfolder of your profile folder.
9. In that same folder, create a new text file named userChrome.css. Please note the file name is case-sensitive, and that Windows hides file extensions by default, which could result in the file wrongly being named userChrome.css.txt.
10. In the userChrome.css file, put the following CSS code. If the first line is already present in the file (in case you already had a userChrome.css file), do not include it again.
@namespace url(http://www.mozilla.org/keymaster/gatekeeper/there.is.only.xul);

richlistitem[id^="downloadsItem_"] {
  -moz-binding: url("downloadSpeed.xml#download-mod") !important;
}
As an alternative to step 10, you can use the CSS code in the Stylish extension instead. In that case, you must include the full path to the downloadSpeed.xml file, for example:
@namespace url(http://www.mozilla.org/keymaster/gatekeeper/there.is.only.xul);

/* Show speed in downloads arrow panel */
richlistitem[id^="downloadsItem_"] {
  -moz-binding: url("file:///C:/Users/GingerbreadMan/AppData/Roaming/Mozilla/Firefox/Profiles/2xqh1840.default/chrome/downloadSpeed.xml#download-mod") !important;
}
Original thread on Mozillazine:
All Replies (5)
தீர்வு தேர்ந்தெடுக்கப்பட்டது
The only solution I found is complicated, and it must be repeated every time Firefox is updated. I will try to detail it as simply as I can.
1. Paste the following address into the address bar and press Enter.
- chrome://browser/content/downloads/download.xml#download
2. Copy the entire code to the clipboard. The code portion is the stuff displayed on a white background (though the color may differ on your setup). It starts after the notice at the top that says, "This XML file does not appear to have any style information associated with it. The document tree is shown below."; do not copy the notice itself.
3. Start a text editor, like Notepad, and paste the clipboard contents there.
4. Change id="downloadBindings" to id="downloadBindings-mod"
5. Change id="download" to id="download-mod"
6. Look for class="downloadDetails" (N.B.: in the current version, there are two such instances in the file). On that same line, change the text fragment xbl:inherits="value=status to xbl:inherits="value=statusTip
7. Open your Firefox profile folder. In that folder, create a new folder named chrome if a folder by that name doesn't already exist.
8. Save the file as downloadSpeed.xml in the chrome subfolder of your profile folder.
9. In that same folder, create a new text file named userChrome.css. Please note the file name is case-sensitive, and that Windows hides file extensions by default, which could result in the file wrongly being named userChrome.css.txt.
10. In the userChrome.css file, put the following CSS code. If the first line is already present in the file (in case you already had a userChrome.css file), do not include it again.
@namespace url(http://www.mozilla.org/keymaster/gatekeeper/there.is.only.xul);

richlistitem[id^="downloadsItem_"] {
  -moz-binding: url("downloadSpeed.xml#download-mod") !important;
}
As an alternative to step 10, you can use the CSS code in the Stylish extension instead. In that case, you must include the full path to the downloadSpeed.xml file, for example:
@namespace url(http://www.mozilla.org/keymaster/gatekeeper/there.is.only.xul);

/* Show speed in downloads arrow panel */
richlistitem[id^="downloadsItem_"] {
  -moz-binding: url("file:///C:/Users/GingerbreadMan/AppData/Roaming/Mozilla/Firefox/Profiles/2xqh1840.default/chrome/downloadSpeed.xml#download-mod") !important;
}
Original thread on Mozillazine:
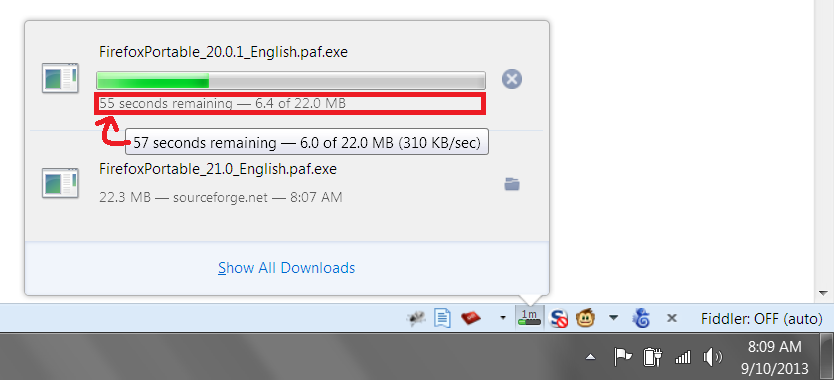
Hi Jontron123, the modification in the above post takes the information available in the tooltip -- which appears when you hover over the item in the download panel -- and inserts it into the actual visible text. If you don't have the time or inclination to do the modification (which is a kind of deep magic), see whether you find that tooltip usable as a workaround.
Hi jscher2000,
I don't see a tooltip when hovering over the item. Any idea?
Thanks.
Hi Yaron, from what I can see, the tooltip with the details only appears when you hover over the text area below the progress bar (this screen shot is from Windows 7).
Hi jscher2000,
Yes, I got it. :) Very helpful. Thank you.
Could you please have a look at another related question? https://support.mozilla.org/en-US/questions/970830?esab=a&s=&r=0&as=s